
Updated October 22, 2025
How To Get Your "My Number" Card In Japan: A Foreigner’s Guide
If you’re living in Japan as a foreigner or planning to move here soon, you’ll eventually come across the term "My Number Card."
This card, featuring your unique 12-digit My Number, will come in handy in many situations during your time in Japan. Therefore, you should know how to get it issued and understand how the system works sooner rather than later, and that’s exactly what I’ll cover in this post.
I’ll explain the My Number Card system and what it means for foreigners living here. I’ll also explain how to get My Number Card in Japan, covering all the methods so you can choose the most convenient one for you.
In this article: 📝
The “My Number” System, Explained
While it’s a big part of life today in Japan, the My Number (マイナンバ, Mai Namba) system was introduced only in the last decade. More specifically, the system first came into effect in 2015, and was aimed at making official government businesses easier for both residents of Japan as well as government agencies and bodies.
In fact, the system is so new that as of 2024, only 79% of Japan’s residents have applied for and received the ID card issued as part of the system My Number Card. The rate was much lower a few years prior and only increased due to additional incentives and points programs initiated by the government.
Essentially, My Number is a string of 12 digits unique to its holder. This allows individuals to identify themselves and verify personal information during official procedures. In daily life, you’ll also hear it referred to as your Individual Number (個人番号, kojin bango).
My Number is issued to all residents of Japan, so anyone who stays in Japan longer than 3 months gets assigned one. Those who are on a tourist visa or on a diplomatic mission are not considered “residents” and are not issued a My Number.
How Does “My Number” Get Issued?
Other common terms related to the My Number system are Individual Number Notices and My Number Notification Card, which you may have already heard of. These two documents essentially refer to the same thing, and they’re the documents you get your My Number in. Let me explain.
Your My Number is issued to you once you register at your local city office the first time you become a resident of Japan. After registration, you’ll receive it in a letter sent by post, which usually takes 3 to 4 weeks on average.
Even if your residency in Japan ends and you leave, you’ll be issued the same My Number if you decide to move back to Japan, so it’s a permanent number.
You’ll receive the number in the mail, but keep in mind that it’s registered mail, so you’ll need to be present at your address to receive it personally. And if you miss it, a note will be left on your door that you can use to have it redelivered.
The letter in which you receive your My Number is called an Individual Number Notice, which used to be called a My Number Notification Card.
Although you will already have received your My Number at this point, you have the option to apply for the plastic My Number card. Having the My Number card makes living in Japan more convenient in various situations.
What Is The My Number Card In Japan?
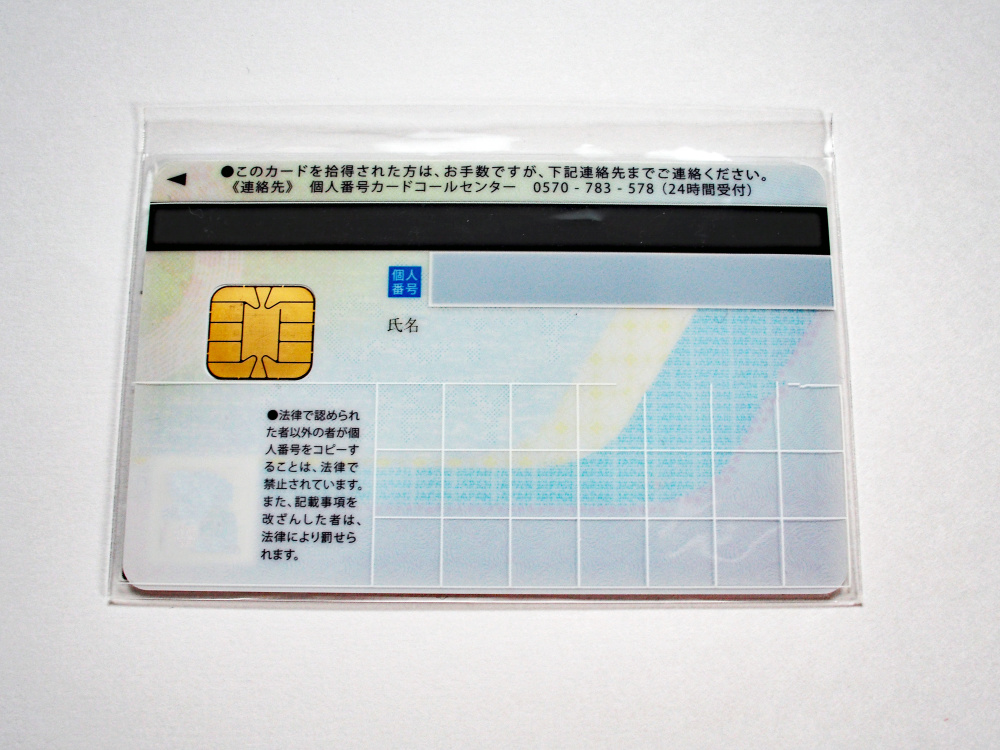
My Number Card is a plastic card that contains your 12-digit My Number. It’ll be useful in various situations where you need to present your ID or have official government business done, so it’s better to get it as soon as you arrive in Japan.
Other than your My Number, here are the other personal information found on a My Number Card:
Your full name
Your registered address
Your date of birth
Your gender
Since your My Number Card contains basic information that can identify you, you can also present it as a valid form of ID in Japan. However, its usefulness extends beyond that, so let’s have a look.
What Are The Use Cases of the My Number Card?
As I mentioned, you’ll need to use your My Number Card in a variety of situations. To be more specific, here are all of the use cases of My Number Card in Japan.
Verifying your 12-digit “My Number”
Getting a copy of your residence certificate or seal (inkan) registration certificate using the kiosks at convenience stores (see my post on Juminhyo)
Filing your taxes online (as I mentioned in my Year End Tax Adjustment post)
Accessing the online social security portals and managing your accounts
Confirming social security and tax-related information
Confirming your COVID-19 vaccination status through the dedicated app
In addition to these, you can also use your My Number Card in most situations where you’re requested to present either your ID card or your health insurance card.
My Number Card Application: The Four Methods, Step-By-Step
Now that you have a good idea of what your My Number and My Number Card are for, let’s cover how you can apply to get yours.
Luckily, you can pick one of the following four methods that suits you best:
By postal mail
On your smartphone
On your computer
At a registered ID photo booth
No matter what method you use, you will receive your My Number Card the same way. There are detailed explanations for each method on the official government website, but if you’re looking for the simplest approach that doesn't involve Japanese at all, applying by mail is your best bet.
I’ll explain all four methods below and provide clear instructions for each, so let’s start with the application process by mail.
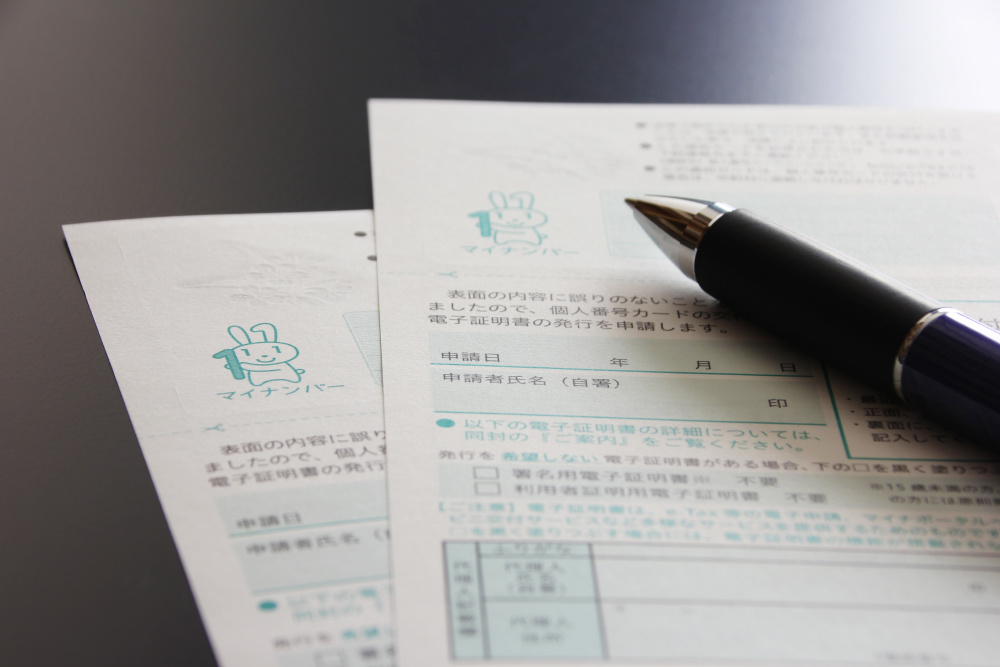
Method #1: Applying For My Number Card By Mail
As a foreigner, the best method to get a My Number Card issued is by applying via mail. You can download the English version of the application form and follow the English directions online, but I have all the steps laid out right here for your convenience as well.
Step 1: Download and Fill Out The Application Form
First, you need to download the application form to receive your My Number Card, which you can get from the official government website.
Alternatively, you can also use the application form that comes attached to the Individual Number Notice, the letter containing your 12-digit My Number, which also includes the envelope for sending the application. Don’t worry if you lost it, as the online version is identical, and the envelope can be downloaded through this link.
Luckily, the website also provides detailed information on how to exactly fill out the form, which is available in English. So, filling out the form should be fairly easy.
Step 2: Pick and Upload a Photo
Your My Number Card is essentially an ID, so you’ll have to provide a photo of yourself to apply.
The photo has to be 4.5 cm in length and 3.5 cm in width, and you need to write your name and date of birth on the backside of the photo before putting it in the envelope with your application.
Keep in mind that the image you pick needs to be taken in the last six months, and your face must be clearly shown from a frontal view. To be certain, you can check the official photo guidelines and see some examples.
Step 3: Prepare Your Envelope and Send It
Now, you’re ready to place everything in the envelope and send it. Before you do, though, you need to fill in your name in the box where it says 氏名 and your return address in the 住所 box on the envelope.
Then, make sure to put a checkmark on the three boxes on the provided envelope, which confirm that:
You attached a correctly formatted photo of yourself
You filled out the application completely
You did not include anything other than the application documents in the envelope
Once your envelope is ready, you can send it by post to this address. Don’t forget to attach a stamp to the envelope, which you can obtain from a convenience store near you.
And that’s it! After submitting your application, you’ll receive an issuance notification in the mail, meaning your card has been issued. Scroll down to learn the next steps you need to take to receive your card.
Method #2: Applying For My Number Card On Your Smartphone (Or Computer)
Alternatively, you can also apply for the My Number Card online using your smartphone. For this, you’ll need the application form that was sent to you by mail when you first received your 12-digit My Number.
Whether you apply through your smartphone or your personal computer, the steps are pretty much the same. The only difference is that you can take a photo directly on your smartphone to use as your ID photo, but you can use a preexisting appropriate photo either way.
Step 1: Register Your E-Mail Address
To start, either scan the QR code on the application form using your smartphone’s camera or go to the official application website on your browser and enter the 23-digit application form ID that’s also located on the form.
While the website is in Japanese and may look confusing, you just need to confirm the terms and conditions on the first page and then fill out the following information on the next page (you can also use a translator extension for this):
Application form ID (if you scan the QR code, this will be filled out automatically)
Your name
Your e-mail address
After completing the captcha below the form and clicking the confirm button, your e-mail address will be registered.
Step 2: Upload A Photo and Fill Out Your Information
Upon registering your e-mail address, you’ll receive a notification in your inbox with a link to upload an ID photo you can take using your smartphone. Uploading a preexisting image from your phone’s storage is also an option.
Simply follow the guidelines provided in this link and upload your photo to the system.
After the photo is uploaded, you’ll also need to provide the following information:
Your date of birth
Whether you need an electronic certificate issued
Whether you need your name in Braille on your ID
Once you complete the form and send it, you will receive an e-mail in the inbox of your registered e-mail address. This is simply a confirmation that your application has been sent, and you can scroll down to find out how to track it.
Method #3: Applying For My Number Card At A Registered ID Photo Booth
Finally, another method of applying for a My Number Card is by simply locating a registered photo booth near you. There are multiple providers, and you can check the website of each one using the links below to find a convenient location:
Make sure to have the application form that’s sent to you alongside your 12-digit My Number with you. Once you arrive at the booth, scan the QR code found on the application form using the machine at the booth and simply follow the guide on the screen.
The machine may or may not have an English language option, but the process is fairly simple, and it roughly goes like this on every machine:
Select the “My Number” option on the screen
Hold the QR code on your application form over the barcode reader
Go through the steps to take your ID photo
Check and approve the information on the screen
Receive a printout confirmation of your application
Now that your application has been sent follow the steps below to check its status and find out how you can receive your My Number Card.
After My Number Card Application: Receiving Your My Number Card
Whether you apply by mail, through your smartphone/computer, or at a photo booth, it will take around a month for your My Number Card to be issued.
You’re not left completely in the dark in the meantime: you can track its status online two to three days after you submit your application.
Tracking Your Application
To track the status of your application, simply go to the Application Status Inquiry Service website and use your 23-digit application ID number and birth date to inquire. This application ID number should be the number included in your initial My Number notification in the mail.
If you don’t have this ID number, please note that putting in the application number you received in your application confirmation notice instead does not work here.
So, if this is the case, you’ll have to contact your local city office to confirm the status of your application.
Similarly, if a month passes after your initial application date, and the status of your application has not changed from “card issuance in process,” it’s recommended to contact your local city office to ask for the status.
Receiving The Issue Notice
It usually takes about a month to get a notification by mail stating that your card has been issued. This is an issue notice in the form of a postcard, and it includes the date and place you can pick up your My Number Card.
When going in to receive your card, make sure to have the following with you:
The issuance notice you’ve received in the mail
Proof of ID (driver’s license, passport, resident card, etc.)
Basic Resident Registration Card (if you have one)
Once you present your documents and verify your ID at the counter, you’ll set your personal identification number and pin code, and your card will be handed to you.
My Number Card In 2025: What’s New And How The Changes Affect You
The My Number Card system in Japan is still evolving. For one, it’s not just an ID anymore—it’s turning into a super useful tool by combining different forms of identification and documentation.
The recent changes to the My Number Card system affect everything from health insurance to driver's licenses. Here’s all you need to know about them.
1. Integration Of Health Insurance Cards And My Number Cards
Starting December 2, 2024, Japan will say goodbye to standalone health insurance cards. Instead, all new health insurance cards will be automatically linked to my number cards, making your ID even more versatile.
So, how do you integrate your health insurance card into your My Number Card?
Getting started is pretty straightforward. Essentially, you’ll need to register your My Number Card to use it as your health insurance card using one of the following methods:
- Use the card readers found at hospitals or pharmacies the next time you visit one.
- Visit the Mynaportal website. PC users will need an IC card reader to scan their cards while smartphone users can simply download the Mynaportal app.
- Stop by a Seven Bank ATM for a quick and easy registration process.
The Benefits Of Using Your My Number Card As Your Health Insurance Card
The reason why your My Number card is combined with your health insurance card is simply convenience. Here are all the ways the new change will benefit you and others:
- Streamlined healthcare services and reduced paperwork: Present your My Number Card at hospitals and pharmacies for quicker access to insurance benefits. No need to carry multiple cards.
- Easier digital record management: Access your healthcare history conveniently via Mynaportal, including your past medication prescriptions, health check-up results, and other health-related data.
- Faster tax deductions: Filing for medical expense deductions during tax season becomes much easier with automatic data entry through Mynaportal.
- Better flexibility after job changes: Even if you switch jobs or health insurance, you can still use My Number Card without waiting for a new insurance card to be issued.
- Eligibility verification made easy: With online eligibility checks, you won’t need to carry additional certificates for high-cost medical expense benefits.
- One card for everything: Forget juggling multiple IDs!
- Lower renewal fees: Renewal fees for My Number Card are slightly cheaper than for a standard driver's license.
- Online license renewal: If you’re an excellent driver with no violations, you’ll be eligible to take your renewal classes online—simply complete a quiz to verify your understanding of the rules and regulations.
- Easy address updates: No need to visit the police station to update your address. Just report the new address to your local government office once and you’re done.
- Future-proofing your ID: It might be possible for your My Number Card to eventually support mobile driver’s licenses, allowing you to carry your license details on your smartphone.
- Extended validity: Permanent residents and highly skilled professionals can benefit from longer extension periods.
- Fewer trips to administrative offices: Address changes and similar events only need to be reported once.
- Residency-specific details: The new card includes critical information like visa status, type, and validity period, which is recorded electronically on the card's IC chip.
- Optional integration: Like the driver's license, the integration of residence cards is also voluntary, so you are free to make your own decision.
- Less stress in emergencies: You don’t need to remember or explain your entire medical history while you’re in pain or distress.
- Helps unconscious patients: If you can’t communicate, your My Number Card speaks on your behalf. Family members who might not know all your medical details don’t need to worry either.
- Faster, better treatment: Paramedics can make more informed decisions about which hospital to take you to and can alert doctors in advance so they can prepare.
- More accurate care: This simply means no more trying to remember the exact name of that medication you take, or forgetting to mention an important past surgery.
- Have a My Number Card (which you hopefully already have if you’re reading this far!)
- Register it as your health insurance card (マイナ保険証)
- When you call 119, the dispatcher may ask you to have your My Number Card ready.
- Once paramedics arrive, they’ll verbally ask for your consent to view your medical information. Don’t worry, you don’t need to enter your PIN or password: they’ll just verify it’s you by comparing your face to the photo on the card.
- Then, they’ll simply scan your card using a special card reader to access your medical data. They use this information to decide which hospital is best equipped for your situation and give you appropriate care on the way.
Validity of Existing Health Insurance Cards
If you already have a health insurance card, don’t worry— you’ll still be able to use it for up to one year after December 2, 2024.
This grace period gives everyone enough time to switch over to the integrated My Number Card system. That said, it’s important to know that if you need to update your name or make changes during this period, you won’t be issued a new insurance card.
For those who haven’t made the switch yet, the government is providing additional measures to ensure no one is left without coverage.
An insurance eligibility certificate will be mailed to those who don’t have a My Number Card or haven’t linked it to their insurance yet. These certificates, which are free and valid for up to five years, will ensure you can still access healthcare.
Additionally, you’ll need to actively register your card as a health insurance card to start enjoying the benefits. If you haven’t done it yet, now is the perfect time to make the switch. This isn’t just about convenience—it also simplifies processes like high medical reimbursements and gives you digital access to your health records through the portal website.
So, it’s in your best interest to make the switch as soon as possible.
2. Using My Number Card as a Driver’s License
Starting March 24, 2025, you can use your My Number Card as a driver’s license. This new system aims to simplify personal identification and add even more utility to the card.
To apply for the change, all you need to do is bring both your My Number Card and your current driver's license to a licensing center or police station.
To get a new My Number Card as a driver’s license issued, you’ll need to pay 1,550 yen. When it’s time to renew it, the fee will be 2,100 yen.
Upon application, your license details, like the type of license and expiration date, will be recorded on the IC chip embedded in the My Number Card.
While the system offers plenty of perks, there are a few things to keep in mind.
For instance, if you lose your My Number Card, it can take about a week to reissue it, during which time you’ll need to follow additional steps to recover your license details.
Also, since you’ll be using a single card for both your license and your My Number Card, the card itself won’t display your license details directly. That said, an app is in development to let you access this information using your smartphone.
Unlike the health insurance card, you can choose to keep your driver’s license separate. You’ll just have to pay higher fees, but it is an option.
The Benefits Of Using Your My Number Card As Your Driver's License
The integration of driver’s licenses into the My Number Card also comes with many benefits:
3. Integration of Residence Cards with The My Number Card
In addition to health insurance and driver's licenses, residence cards (Zairyu Cards) are also being integrated into the My Number Card system.
The new card is called the “special residence card (Tokutei Zairyu Card — 特定在留カード),” and the program is expected to begin in fiscal year 2025, though exact dates are yet to be announced.
No worries, as the government plans to ensure a smooth transition by adding more clarity on the procedures before the actual rollout.
Applications for the special residence card can be made at immigration offices during regular updates to your residence status, such as renewals or changes.
Alternatively, you can apply for the integrated card at your local municipal office when notifying a change in your address or residence.
The Benefits Of Using The New “Special Residence Card”
Finally, let’s take a look at some of the benefits the new special residence card will bring:
4. Emergency Response: Using Your My Number Card When Every Second Counts
Starting October 1, 2025, a new nationwide system called “My Number Emergency” (マイナ救急, or “MaiNa Kyukyu” in Japanese) has launched across all of Japan’s 1,720 fire departments. This system can literally save your life, so understanding how it works is important.
Essentially, the system allows emergency responders to quickly access your critical medical information using your My Number Card when you need urgent care. Let’s take a closer look.
What Is My Number Emergency?
My Number Emergency enables paramedics to use your My Number Card (registered as a health insurance card) to instantly view your medical history, current medications, and recent hospital visits.
When you’re in an emergency situation, you might be unable to speak, or your family might be too panicked to remember all your medications. These situations happen more often than people think.
The system has been tested since 2022 in pilot programs on a smaller scale, but starting October 1, 2025, it’s expected to be used by 5,334 ambulance teams across the country. This covers 98% of Japan’s emergency response units.
Why This Matters for You
The benefits of the My Number Emergency system are clear and practical:During the pilot program, there were cases where patients in cardiac arrest or with altered consciousness were saved because paramedics could quickly access their medical information and get them to the right hospital for emergency procedures. So, rest assured, the system works.
What You Need to Do Now
To use My Number Emergency, you need two things:
If you haven’t registered your card for health insurance yet, do it now before you need it. Check the official MynaPortal website for registration instructions if you’re confused.
Here’s an important tip: Carry your My Number Card with you at all times, especially when you’re out and about. At home, keep it in a specific, accessible location. The system only works if your card is available when paramedics arrive, so it won't help if it’s hidden somewhere where no one can find it.
How It Actually Works
Once the new Emergency My Number system comes into force in October, the process after you call for emergency care will go like this:
Keep in mind that if you’re unconscious and can’t give consent, paramedics are allowed to access your information when it’s necessary to save your life.
What Information Can They See?
Here’s exactly what emergency responders can access: your name, address (from the card), and medical information, including past 3 months of hospital visits, current medications (past 45 days of prescriptions), past surgeries (5 years), diagnosis information (3 months), and recent health checkup results.
Here’s what they can’t see: tax information, pension details, or anything else not related to emergency medical care.
Your information isn’t stored on their devices. They are only allowed to view it temporarily.
The system is made transparent because it deals with personal information. So, if you’re curious about when your medical information has been accessed, you can simply check the viewing history through your MynaPortal account.
My Number Emergency is another solid reason to get your My Number Card registered as your health insurance card and keep it with you. In an emergency, it could make all the difference between life and death.
Closing Thoughts and Useful Links For Foreign Residents
While I tried to present all of the information as clearly as possible, you may still have some questions.
Especially as a foreigner living in Japan, it can be tough to handle official stuff like this, but you’re not without support. Not only do you have articles such as this at your disposal, but you also have the Individual Number Card website that offers full English support and a detailed FAQ section.
What’s more, if your questions are still left unanswered, you can also call a hotline that has English support.
You can reach the Individual Number Card Call Center at 0570-064-738 or 050-3818-1250 and it’s available 24 hours.
Lastly, if you prefer visual content instead, you can watch this YouTube video to get the latest news and updates about the changes in Japan’s permanent residency laws and My Number Card.
While this is all we have on my number card applications, if you have more questions about how things work in Japan, my posts on accounting in Japan and how to get permanent residence in Japan might pique your interest.


Japan Dev Team
This post was written by our Japan Dev editorial team.
- Applied AI Engineer (moment by cookpad) - Senior Principal Level
- Cookpad
- Tokyo
- ¥20M ~ ¥35M
- Full Stack Engineer
- AI Robot Association (AIRoA)
- Tokyo
- Senior Software Engineer (Python/Web Dev) - HENNGE Access Control
- HENNGE
- Tokyo
- ¥8.5M ~ ¥12.5M
- Senior Software Engineer (Backend/Infrastructure) - HENNGE Secure...
- HENNGE
- Tokyo
- ¥8.5M ~ ¥12.5M
- Software Engineer (Frontend / Vue) - HENNGE Email DLP
- HENNGE
- Tokyo
- ¥8M ~ ¥10.5M


Latest Tech Jobs 🇯🇵
Explore the top developer jobs in Japan for foreigners
- Applied AI Engineer (moment by cookpad) - Senior Principal Level
- Cookpad
- Tokyo
- ¥20M ~ ¥35M
- Full Stack Engineer
- AI Robot Association (AIRoA)
- Tokyo
- Senior Software Engineer (Python/Web Dev) - HENNGE Access Control
- HENNGE
- Tokyo
- ¥8.5M ~ ¥12.5M
- Senior Software Engineer (Backend/Infrastructure) - HENNGE Secure...
- HENNGE
- Tokyo
- ¥8.5M ~ ¥12.5M
- Software Engineer (Frontend / Vue) - HENNGE Email DLP
- HENNGE
- Tokyo
- ¥8M ~ ¥10.5M
- Head of SEO
- Metanomaly
- Tokyo
- Sr. Software Engineer (AI Product)
- amptalk
- Tokyo
- ¥7M ~ ¥10M
- Security Specialist - Corporate Security, Digital Bank, Tokyo
- Money Forward
- Tokyo
- ¥8M ~ ¥17M
- Senior Backend Engineer (Go / Kubernetes) — Tokyo
- abbeal
- Tokyo
- ¥9M ~ ¥16M
- Lead Frontend Engineer — Digital Bank — Tokyo
- abbeal
- Tokyo
- ¥9M ~ ¥15M


Get Job Alerts
Sign up for our newsletter to get hand-picked tech jobs in Japan – straight to your inbox.
© 2026 Japan Dev. All rights reserved.
Proudly built in Tokyo.
Curated with 💙 in Tokyo
All our data is gathered from publicly available sources or contributed by users